Contents
Soldering
Last updated: 4/18/22
I’ve been asked about a million questions related to soldering/brazing well, that’s a huge exaggeration but, it is the subject of many of the questions that I’m asked, and for good reason. There is probably, no other technique, that causes as much fear, uncertainty, and confusion, as soldering. Soldering, and doing it well, takes practice. But, given the right training and some hands-on rehearsing, everyone can solder well.

Most things can seem daunting at first glance: think of the messiest room that you can imagine (no, not my studio). Then think about how you’d feel if someone said: “clean it”! Overwhelmed (and probably a little irritated that you got stuck cleaning this imaginary room), you look around – a bit dazed and confused. But, turn on a good audiobook, start in one corner, have a few storage boxes, a couple of hooks, a cabinet or two, and time and before you know it, the room is clean. It’s overwhelming to focus on the total scenario. But, if you focus on just one small spot, it’s manageable. So, we are going to look at soldering by only directing our thoughts to small parts of the whole.
I’ve broken, in this discussion of soldering, down the process, materials, and tools. As the many videos and web pages, listed above, attest: I’ve produced a lot of material on soldering. Please take some time and check out my web pages and my videos.
So, like cleaning that messy studio, we will take small steps.

As you no doubt know, by now, soldering involves heat – a lot of it. We use a gas torch to enable our metal to reach the temperatures necessary to make the solder flow. The solder bonds to the metal by capillary action (think water moving up a paper towel). Whether you are working with any of the various silvers, golds, or base metals (bronze, brass, copper, etc.) the following techniques will be relatively the same. Each metal has its own peculiar characteristics though, which will slightly affect certain parts of the process. A few will be discussed in detail, later on.

Solder
Solder is the glue that holds the various pieces of metal together. In order for the solder to flow, the metal must be clean – all of it – including the solder and the flux. The reason for this is that dirt, grease, oxides, etc. will create a barrier between the metal and the solder. Think of the dirty surface like a plastic wrap over your ham sandwich (your potential solder join). The plastic wrap keeps you (the theoretical solder) from your delicious sandwich. If you remove the wrap, your mouth, and the sandwich can join happily together. (Is this the weirdest {and perhaps – worst} analogy ever?).
Details on solder, itself, are discussed in detail on my On Solder Page. Discussions on solder in this section will involve its interaction in the soldering process and problems that can occur.
Soldering Success – The Four Steps
I’ve come up with 4 different procedures that should ensure success when you solder. These steps are:

- Good Fit
- Clean Metal/Solder/Flux/Hands
- Heat
- Flux – please see the page titled: Soldering 101 – Oxidation, Flux, and Firescale/stain Prevention.
Step One: Good Fit
This just means that the two pieces of metal that you are joining together, fit as closely as possible.

In the instance of a Butt Join, such as you would use for a ring or joining a bezel together, The edges should be flush and fitted tightly. When held up to the light, you should see very little shining through.

When using round wire and tubing, you should file a flat spot, on each side, of the pieces that will be joined together. Not only will this make it easier to keep the pieces from rolling, during the soldering process, but, it will add strength to the join. This will result in more area for the solder to flow.
See my video: Flat Square Edges on Sheet Metal for information on how to achieve a good fit. Also, two invaluable tools for obtaining square edges on metal, tubing, and wire are Miter Cutting Jig and Vise (See my page on this tool) Miter Cutting Jig and Vise and the Machinist’s Vise (AKA: Toolmaker’s Screwless Vise). There are also Tube Cutting Pliers that can be used for tubing and wire. They are also great for holding tubing and wire if you need to clamp it down: for drilling, for filing grooves into it, etc.
Step 2: Clean Metal/Solder/Flux/Hands

Most people realize that their metal should be clean but what about flux and solder? Another thing people forget about is their hands. You might start out with sparklingly clean fingertips but, did you scratch your face, buff that ring, or pet the cat right before setting up to solder? If so, you can bet your hands contain some form of “dirt”.
Clean Hands
Your face contains a lot of oil glands so, while in the studio, get in the habit of keeping your hands off of your beautiful face. Ditto for the cute cat.

You can wash your hands with gritty soap like Boraxo. Some soaps have added moisturizers and could add a layer of oil to your hands.
Cleanliness is imperative for successful soldering because, quite simply, both the solder and the flux, will not flow across dirt of any kind: oxidation, grease, and yes, dirt. So, to ensure that you get a perfect solder join, wash up.
Dawn dish detergent and hot water works too. Your hands will be a mess. They will be dry, cracked, and calloused. Your hand modeling career is officially over.
Clean Metal
Cleaning your metal is discussed in my video: How to Clean Metal. Sandpaper is also an effective way to clean your metal. It has the added benefit of taking “the shine” off of your surfaces. Flux doesn’t flow well on shiny metal so, abrading your surfaces to be soldered will help ensure an even coating of flux. I use 400 to 1000 grit sandpaper for this process.
After cleaning your metal, hold it by the edges, to reduce any contact with dirt.
Clean Solder
Cleaning solder is pretty easy if you are using sheet or wire – you just clean it like sheet metal. With the wire solder, I pull it through a green scrubby a few times and dry it with a towel.  It gets crazy when you have to clean pallions though. You can put your pallions into an ultrasonic cleaner. Use a wire mesh container, like those used by watchmakers, to place your pallions in. In England, you can get one at Redroosteruk Ltd. In the USA: Esslinger.com (under $4.00, US). Amazon carries a similar type. Tea strainers are another alternative – one with a fine mesh. Picking pallions from the bottom of the ultrasonic probably isn’t too much fun!
Clean Flux
Flux can get contaminated by dipping your flux brush into the container. After a while, the bottle will fill up with debris and other contaminants (like bits of rusting steel from paintbrushes, bits of charcoal from your soldering block) and your flux will get dirty. To save you from having to buy new flux – just because it’s dirty – use a small, low-walled container to put your flux in.  Tops of jars work fine. Just pour in enough for the day and discard the rest. Don’t pour it back into the bottle!

There are also flux dispensers that work great. Although, after a while, they need to be thoroughly cleaned because the flux crystallizes when it dries. The crystals inhibit the function of the dispenser. But, it takes quite a while for this to happen. The dispenser keeps your flux clean and dispenses flux in controlled amounts. Amazon and other jewelry suppliers carry this product as does Rio Grande.
There are also flux dispensers that come in squeeze bottles with variously-sized  needle dispensers. These work well if you squeeze the flux into a little bowl. Otherwise, they can flood the area with too much flux.
TIP: After flux application, heat the flux until it glasses (the white bubbly stuff calms down). Now, dip your paintbrush in a bit of flux, pick up a pallion of solder and place it on the (cooled but, still warm – paintbrush won’t melt) metal. The solder has less of a chance of bubbling off now. You can also ball up the solder first – the solder granules don’t flip off as easily.
Flux Brushes
Just an aside here: use decent brushes for applying flux. Cheap plastic brushes won’t easily pick up and place solder pallions. Decent brushes make solder placement less frustrating. If you touch a plastic brush to hot metal, of course, it will melt. The brushes made from fur or hair don’t survive unscathed either. But, you can trim them down and continue to use them. I, generally, purchase a few, new brushes each year. I, also, like to have at least two different sizes on hand: one for larger areas and one for smaller.
There are brushes designed just for applying flux. Rio, of course, sells one type: the non-contaminating flux brush in sizes 1 and 8 (larger). They are non-contaminating because they don’t use steel to hold the bristles in – eliminating any potential rust or steel transfer to your work.
You can also use small, Chinese bamboo brushes. They have great tips and are relatively inexpensive.
Step 3: Heat
One of the biggest problems in learning to solder is the fear/fearlessness of the torch wielder –  which is just a reflection of the user’s inexperience with the tool.
Most students are so afraid to melt their pieces that they never quite reach solder flow temp. Of course, there is the other extreme, where every soldering experience ends in liquid metal. What to do?
Well, this is where practice comes in. Start with scrap metal. Practice every type of join – Butt, “T” or Strip and Sweat Soldering (link to my video on Sweat Soldering). Solder again and again and be fearless. If it melts, try again with less heat, and less time. There is nothing wrong with melting your metal – if it is a practice piece. Melting a piece of jewelry that you’ve spent hours on is sooooooo depressing. But, IT DOES HAPPEN! Eventually, though, you and your torch will have bonded and the number of jewelry (jeweler) meltdowns decreases significantly.
One thing that will help you to achieve a flowing solder seam, is to have the correct torch tip for the size of your work.
So, those that are melters (you know who you are!) have no problem getting their solder to melt. But, is it flowing? Is it running along the seam or did it scale the walls on one side? Did it get so hot that the solder was absorbed by the metal? Do you have pits? (You overheated the piece and burned out the zinc in the solder!)
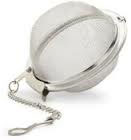
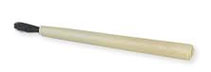
Which torch tip would you use for this size metal (not actual size, it is a ratio comparison)?

The answer is: B You want a torch tip, especially with silver, that will heat the metal up rather quickly.
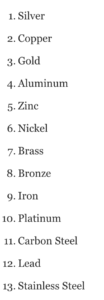
Pure Silver (235° (Btu/(hr oF ft)) is the best metal conductor of heat – copper (223°(Btu/(hr oF ft)), is next in line followed by gold (182°(Btu/(hr oF ft)).
Here is a conductivity chart for metals from ThoughtCo, arranged from best to worst.
Now, knowing these facts, you can understand why you need a larger torch tip (which results in a larger flame)! When that fiery, ultra-hot flame heats your metal, the heat starts to travel and it travels AWAY from the flame. So, in the example above, the larger tip (tip B) is going to heat the metal faster. It could take quite a while to heat this whole piece with the small torch tip. Then, you would probably have developed a lot of oxidation and expended a ton of gas. You would also be thinking about now: “wonder if this solder will ever flow?”
All items touching the metal you are soldering, especially metal, will pull away some of that heat, slowing down the process further. The term heat sink applies to the pulling away of the heat. Sometimes you want a heat sink, like when you are trying to protect a prior solder join or a thin, small object like a stone setting. Charcoal blocks absorb heat but, they reflect it back up onto the metal.
Torch tips come in a variety of sizes. The numbering system depends on the type of torch you have.
Torch Tips – Choosing the correct size for the job
So, if you’ve gone through your checklist of fit, flux, cleanliness and the solder isn’t flowing, think about changing tips.
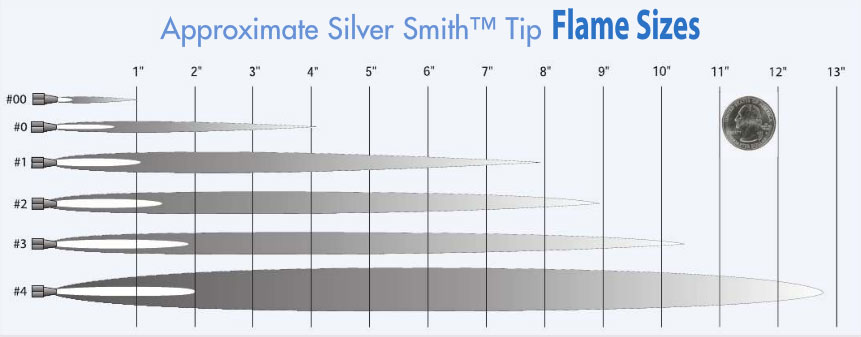
Here are two flame charts from Rio Grande. See how different the flame sizes are for the same numbers. In my video, I compare the #2 tips.

You’ll probably want to own at least two tips. Three would be better. In fact, that’s pretty much all I use. I have a small tip, medium, and large. The large tip is used for annealing, steelwork, refining, and for soldering large pieces. The small tip is for tiny solder joins – like a 3mm basket setting or jump ring soldering. I use my middle-sized tip for most of my soldering processes.
Heating The Metal
The next important information on heat is that, in order for the solder to flow, you must heat the metal on both sides of the join, up to solder flow temperature. If you heat one side more than the other, the solder will flow to the “hot side”.
Don’t heat the solder. The solder is one of the smallest pieces of metal on your piece. It will melt first but, won’t do much except (if you heat it enough) absorb into the metal, maybe start eating away at the metal, resulting in pits or melting into a puddle.
When you are soldering silver (sterling and fine – not Argentium or gold – they don’t conduct heat as well: see more information below) and copper, you want to heat the largest pieces first.

The drawing on the left illustrates how to heat a piece with multi-sized elements.
As the black square gets hot, it transfers heat to the pink square. So, the pink square is pretty warm now. At the same time, the small blue square is getting pretty hot too because, it is the smallest element – there are fewer places for the heat to run off to and elope. By the time you bring the torch to the blue square, the solder will probably be flowing or danged close. Usually, you don’t even need to heat area three.
How can you tell when it’s time to move the torch? Watch your flux or the color of the metal. The flux will get translucent near solder flow temperatures. The silver will get light pink and the copper, brass, and bronze will get red. The most obvious clue of all is that the solder melts or flows. Don’t forget, copper, in particular, likes to create tons of oxidation. Because of this tendency, you need to get in there hot and fast! Don’t slowly heat copper up, if you can at all help it.

When soldering Argentium or Gold, the heat doesn’t run like a madwoman. The heat tends to stay near the torch so, heating the entire piece is not that important. You can direct the heat, with these metals, to the two sides, near the join, where you want the solder to flow.
When I solder, I move my torch in and out, heating and letting it cool, heating and letting it cool. By removing the torch I can check for melting metal, solder flow, and other indicators. A light fast touch is needed when the solder is about to flow.
Step 4: Flux
For information on the 4th step: Flux, please see my page: Soldering 101: Oxidation, Flux, and Firescale/stain Prevention.
Excerpt from Oxidation, Flux, and Firescale/Stain Prevention page:
“Flux plays many important roles in soldering.
- It is responsible for reducing surface tension, allowing the solder to flow.
- It creates a glaze, on the metal, which protects the metal from interaction with the atmosphere.
- Flux is also used as a temperature indicator when soldering – when either paste or liquid flux reaches the solder flow point, they become translucent.
- Flux needs to be compatible with the metal being used. Use fluxes designed for the metal you are using.
- Flux has a temperature ceiling. If the heat present, surpasses the working temperature of the flux, the flux will no longer work. Liquid: 1100°F (593.33C°) – 1700°F (926.67°C) Paste: 1100°F (593.33°C) – 1500°F (°815.56C).
- IF you are using solder paste, check to see if flux is included in the mixture. If it is, you don’t need to flux. But, you might want to add additional flux to protect your sterling from fire scale!
Flux is important for soldering, even if your metal doesn’t produce oxidation, like fine silver or Argentium silver. It helps solder to flow.
Related Videos
-
- How to Set Up a Torch – have a torch, need to set it up? Here’s how.
- Soldering 101, part one, and Soldering 101, part two
- All About Solder – You need to understand what you are working with!
- Flat Square Edges on Metal – Important techniques for creating square edges like on ring shanks, tubing, settings, etc. – pretty much any two pieces that you want to solder together!
- Getting Ready to Solder – Important steps before you solder.
- Identify Wire Solder – Mark your solder before confusion reigns!
- Jewelry Studio Safety – Extremely important information that every jeweler should know! Don’t risk your life or your health! Know the dangers of metal dust? If not, don’t sand anything – yet!
- Creating Consistently Sized Spheres – how do you make perfectly round spheres? You might need to know!
- How to Anneal Silver Sheet – an important skill to have otherwise, you can damage your metal and work twice as hard!
- Annealing Wire – Want broken wire? How about melted wire? Need your wire soft and bendable? These tips will help you to avoid these problems and work with ease!
- DIY Fume Extractor for the Studio or Shop – One of the BIG ONES for studio safety. Learn to make your own!
- How to Make a Bezel and Set a Cabochon Part One – Want to solder thin material to thick? Want to set a stone or two? Learn how to create and solder bezels.
- How to Make a Bezel and Set a Cabochon Part Two – Ditto from above.
-
Soldering Jewelry: How to solder settings, bails and wire. – We solder dissimilar shapes and sizes of metal together, all the time. Want to stop melting your settings or bails? Can you solder wire without melting it?
-
rel=”noopener noreferrer”>Soldering Jewelry – Sweat, Flush, or Applique Soldering – How to solder two pieces of metal on top of each other. Learn tricks for successful joining of dissimilar sizes and how to apply solder.
- Why You Need An Oxygen Concentrator (released 4/25/22)
-
-
My YouTube Soldering Playlist – A list of all my soldering videos on YouTube.
-